Saturday, 27 June 2015
Fashion and Style Lookbook: 100 Latest Lace Styles & Colours for Women (Nigeri...
Fashion and Style Lookbook: 100 Latest Lace Styles & Colours for Women (Nigeri...: This Nigerian aso-ebi styles and designs video is a gallery of 100+ pictures of the latest traditional wedding guest fashion outfits ...
100 Latest Lace Styles & Colours for Women (Nigerian & African Fashion)

This Nigerian aso-ebi styles and designs video is a gallery of 100+ pictures of the latest traditional wedding guest fashion outfits seen in high society weddings - various colours, designs & fabric ideas including ankara, lace & more.
VideoCredit :NaijaGlam Weddings
Thursday, 25 June 2015
Fashion and Style Lookbook: Water Marble Nail Art Step By Step Tutorial
Fashion and Style Lookbook: Water Marble Nail Art Step By Step Tutorial: Enjoy this beautiful tutorial by JinJinLi

Fashion and Style Lookbook: Nail Art Water Marble Secrets Revealed + Tips & Tr...
Fashion and Style Lookbook: Nail Art Water Marble Secrets Revealed + Tips & Tr...: Have you tried water marble manicures in the past? Have you been less than satisfied with the results? Did you experience air or water ...
Nail Art Water Marble Secrets Revealed + Tips & Tricks!
 Have you tried water marble manicures in the past?

Have you been less than satisfied with the results?
Did you experience air or water bubbles that made your nail art look less than stellar?
Maybe the polish all pulled off the surface of the water every time you tried to draw a design?
Would you love results like these?
Well. Have I got the tutorial for YOU!
LOL.
But seriously, folks...
So here's the deal. I've seen some amazing water marbles out there on MUA and flickr, etc. But every time (until very recently) I tried to achieve those results myself I have failed miserably. Why? I didn't know. I read every tutorial I could find. I watched countless youtube videos. They make it LOOK so easy! But when I tried to do it myself, the universe just wasn't playing ball.
Until about 2 days ago. I don't even know what happened. The stubbornness in me just took over and I wasn't going to stop until I broke the code! ;)
This post is the result of all the attempts I made at water marbling and all the things I learned in the process. I am NOT a water marble expert! I just hope my tips and tricks help others out there get the results they are after. I was pretty frustrated until I figured it out.
Save yourself the frustration! Read this FIRST!!!!
Enough talking about it. Let's get started. Here's what you'll need before you begin:

Water Marble Supplies
Gather all these supplies BEFORE you get started:
Distilled or Filtered ROOM TEMPERATURE water (except if your room is super hot or cold! lol)
Your chosen nail polish colors (at least 2!)
Q-tips
Toothpicks or an orange stick (for cleaning up the extra polish from surface of water)
Tweezers (for picking off stray hairs- especially helpful if you have furry babies around!)
Scotch tape or Vaseline (to keep your fingers mostly clean during the process)
Scissors (to cut the tape off when you're done)
A brush for clean-up ( I use an angled eyeliner brush from Target)
OPTIONAL- something metal and pointy. (I use a mini fondue skewer but you could get away with a toothpick or orange wood stick)
Basically in order to water marble, you are going to drip drops of polish onto the surface of the water, draw a design in the polish, and dip your nail into the design so it sticks.
NOTE: I use both of the pictured cups. Sometimes I find the disposable mcD cup works better, other times the little sippy cup works better. Go figure. I know glass works well also and the upside of that is it's NOT disposable- you can clean the gooey polish off with acetone and re-use it (for polish ONLY) till your heart's content.Step 1:
Start with a regular mani. Base coat, and at least 1 coat of a base color of polish. White works well if you plan to use light or bright (neon) colors. Silver can look pretty darn cool also and it's what I used in the above pic. When the colors disperse they become slightly transparent. The silver base gave the neon pink I used a gorgeous glow!
Step 2:
Tape up your fingers or cover them in Vaseline or cuticle oil. I find tape to be the easiest to use. There is a tutorial on youtube here for how exactly to tape them so it's easy to get off when you're done. The idea is to protect your skin so your fingers aren't covered in polish when you dip them in the water.
Step 3:
Fill your cup with water. Actually you might want to do this before you have tape all over your fingers. ;) Make sure the caps of your polish bottles are loose and ready to go before you start. You need to work somewhat quickly for this to all work out.
Step 4:
Drop your polish into the water. You want to be just above the surface. If you drop it from too far away sometimes the polish will drop to the bottom of the cup or you'll get splashes of polish or air bubbles.
Note: If your colors are coming out too pale, leave the brush over the water longer. When the brush is JUST barely touching the water, leave it there longer and the water will "pull" more color from the brush to give you brighter results.
There are many video tutorials for doing specific designs. I'm going to focus on the basics here. Just check out youtube if you want to see all the possibilities!
All the designs I've seen call for building a "bullseye." So drop one color into the center of the cup. Then drop the next color directly in the center of the first color. The next color goes in the middle of the last one and so on. Continue until you have built up your "bullseye."
NOTE: I have noticed in my experiments that the first 2 or 3 rings of the bullseye can be any color! So if you want to conserve a certain polish, use something you don't care about to START the bullseye. This will make more sense after you read the next step. ;) Step 5:
This is where my super duper stubborn brain comes into play. This is when you "draw" your design.
Very gently drag your tool through the polish to make your design. Again I use the little metal skewer. You can use a push pin as well. Lots of girls use an orange wood stick- I like the precision of the sharper point on the metal tools.
Every time I tried to do this before, I would start to drag my tool through the polish and things got bad from there. The polish gummed up and all lifted off with the skewer. It sticks to it and I can't get a pretty design. I think I have found the solution to that problem.
I thought maybe it was my water ( I tried britta, pure, and distilled water!), the temperature of the water, the cup, etc. FINALLY I think I figured it out!
When you start to draw your design, DON'T START FROM THE VERY OUTSIDE EDGE!!!!!
That's it! Sounds simple, right?! XD
Here's what I mean:

If you start "drawing" from the outside edge, things fall apart quickly!

Red means NO, green means GO! Start a few rings IN towards the center and continue "drawing" your design.
Note: After every "line" you "draw" wipe off your tool. Polish loves to stick to polish- so it's easier to "draw" with a clean cool.Step 6:
Once your design is good to go, pick a spot that you want to aim for that you think is pretty.
When you are ready to dip your nail into the water, make sure you have it at the right angle.
Before, when my water marbles looked like poo, I was essentially doing a belly flop onto the design. Finally I learned that in order to avoid air bubbles, you need to keep your nail at an angle and dip it in more gently! haha!
Here's what we're trying to avoid:

See those unsightly spots? Those were air bubbles. Yeah. Not pretty.

They allow the base color to show through.
Here's what I mean by the correct angle:

To avoid air bubbles, LEAD your nail into the water with the free edge and keep the angle consistent as you dip.
Step 7:
Once your nail is under the water, leave it there for a sec. While you're doing that, clean the surface of the water with a toothpick or orange wood stick, etc. Just use your tool to scrape polish off the water. It comes off like this:

Except your finger will still be in there! haha!
Once your water surface is clean, slowly slide your finger out at the same angle you put it in.
Note: If you have any water drops on your nail you can soak them up quickly with a Q-tip or the corner of a paper towel. DON'T TOUCH THE POLISH! Just the water. It should come off easily. Anything other than a large-ish drop of water usually just dries ok and does not become a problem. Here's what I mean:

Gently soak up water drops.

Gently soak up any water drops.
Step 8:
Once you're all done with that finger, you can cut the tape off (or leave it till you finish that hand) and continue the other fingers!
Note: Sometimes the surface of the water will become "dirty." There will be small bits and pieces of polish or something, who knows what, floating around in there. We don't want those to end up obscuring our design or getting on our nails. To clean the surface, drip a drop or two of polish on the water, use your tool to spread it ALL THE WAY TO THE EDGES OF THE CUP, and wait a second for it to dry. Then use your tool to pull it off the surface and look! All clean!
Here's proof:

add a couple drops, pull edges to sides of cup. wait till it's dry.

See? all the way to the edges of the cup.

Then scrape if off by running your tool along the outside edge of the cup.
The polish lifts off easily leaving behind clean water!
*SIGH*
Well, my friends.... I think that's it! I REALLY hope you give water marbling another try. It can be really fun! There's so many different color combo's I want to try - and it's hard to figure out how to make a pretty nail art design with 4 or 5 colors don't you think? But water marbling is perfect for it!
I hope you have enjoyed this tutorial. Feel free to comment and ask questions. I will reply! ;)
And much love to all the girls on MUA and also to mysimplelittlepleasures for trying to help me! Seems like in the end I always end up helping myself...
Here's some more pix of the resulting mani:
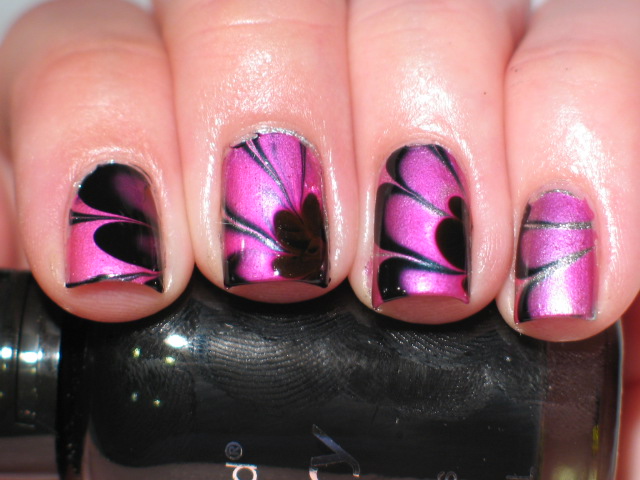
nail art water marble- neon pink and black over silver base

I think it turned out pretty!

my best water marble, yet! XD

Although it IS hard to take pix of your dominant hand...here she is!
Credit:Laquerish
Tuesday, 23 June 2015
Fashion and Style Lookbook: Top 7 Natural Remedies for Oily Skin During Summer...
Fashion and Style Lookbook: Top 7 Natural Remedies for Oily Skin During Summer...: Just as winter bids us goodbye for the year and the warm breezes of summer start blowing, people get ready to get out and enjoy the sun...
Top 7 Natural Remedies for Oily Skin During Summer – Best Tips

Just as winter bids us goodbye for the year and the warm breezes of summer start blowing, people get ready to get out and enjoy the sun in beaches and parks. But for many of us blessed with oily skin, it almost seems like the end of pimple and acne free days, as we reach out for our blotting sheets, oil-free sunscreens, cleansers and cooling gels to keep the sebaceous glands under control. Although, oily and combination skin needs a lot of extra care and attention, but to look at the brighter side, it ages much slower than normal and dry skin and keeps away fine lines and wrinkles for a longer period of time.
Basic Points to Keep in Mind for Care of Oily Skin:
These are some of the basic tips of skin care that you need to introduce into your skin care routine if you have oily skin.
These are some of the basic tips of skin care that you need to introduce into your skin care routine if you have oily skin.
Try to use lukewarm water for cleansing oily skin, as it dissolves oil more effectively than cold water.
Cleansing your face twice a day is enough for keeping it clean. Don’t overdo the cleaning as it can over dry skin and trigger oil production from the sebaceous glands.
Use a gel based cleanser containing salicylic acid, citric acid and glycolic acid that help in reducing dead skin cells that clogs pores and leads to pimple outbreaks.
Don’t scrub too much. Exfoliating the skin 2-3 times a week is more than enough for removing dead cells and black heads. Skin produces natural oils to store moisture, keep it hydrated and fight irritations. Over doing on the scrubbing strips the skin of its natural oils and moisture.
As the summer season starts, go low on makeup. Substitute the heavy foundation for tinted moisturizing creams containing silicone that does not dissolves in to the pores and clogs them. It also creates a barrier between skin and heat.
Use a soothing face mask made of fuller earth (multani mitti) or sandal wood once a week to soak up excess oil, remove impurities and cool the skin.
Control the temptation of touching your face with your hands, as it transfers additional oil, dirt and germs to your face making it prone to outbreaks. Scalp and hair produces oils too, so try to pull it back and keep away from your face during summer.
Watch what you eat. Those alluring cocktails and fried oily food might appear tempting, but they add extra oil to the skin making it susceptible to acne and pimples. Try to avoid food rich in oil and substitute them with food rich in vitamin A, such as, sweet potatoes, carrots, leafy greens such as kale, spinach, lettuce, red peppers, and fruits like cantaloupe, apricot, mango, etc.
Supply enough water to your body and skin by drinking 8-10 glasses of water every day.
7 Home Remedies for Oily Skin during Summer Season:
Tired of experimenting with various types of over the counter cleansers and ointments that promise to clear the problem of pimples and acne from the root but fail to show any results in reality? Forget the toxic chemicals and try out these natural skin care tips and home remedies for oily skin and pimples that boasts of the wholesome goodness of nature.
Oat Meal and Aloe Vera Scrub:
Aloe Vera has been used for its medicinal qualities since ancient times. The anti-inflammatory properties of aloe help in treating acne, sun tan and skin infections. Take a handful of dry oats and mix it thoroughly with some aloe vera gel and apply on face and massage gently with your fingers in clock wise and anti-clock wise direction for 3-5 minutes. Leave on for 5 minutes and rinse off with water.
This is a great natural scrub that exfoliates the skin and clears dead cells, black heads and white heads. Do not use the scrub on pimple and acne affected areas, as it may aggravate the irritation.
Apple and Honey Face Pack:
Crush a seeded apple and mix 3 tablespoon honey with it. Apply on clean face. Leave for 20 minutes and rinse off with water. Honey helps in removing excess oil from skin and reduces black and white heads.

Banana and Honey Face Pack:
Blend one banana with a table spoon of honey and a tea spoon of lemon juice. Apply on face and let it dry for 20 minutes. Remove the pack with a hot towel or rinse well with water. Lemon juice being a natural cleanser helps in removing excessive grease and sebum and its acidic properties helps in removing tan.

Mango Mask:
Mash a whole ripe mango in to a smooth pulp and massage it softly and evenly on your skin. Let it sit for 10 minutes and then rinse with water. This mask helps in unclogging pores and removing impurities.

Egg Yolk Face Pack:
Egg yolk is known for its tightening effect on skin. It also cuts out excessive oil from skin. Break one egg and separate its yolk. Use a cotton ball to apply the yolk on excessive oily areas of the face, such as, nose, chin, cheeks, forehead and temple. Let it dry for 10 minutes. Rinse well with water.

Peppermint Toner:
The astringent property of peppermint makes it a wonderful toner. It is very useful in treating pimple, acne, irritation, itching, sunburn and cooling the skin. In order to make the peppermint toner, put a handful of peppermint leaves in a cup and pour boiling water over it. Wait for half an hour and then strain the liquid. Cleanse your face and apply this natural toner to your face with a cotton ball.

Store the rest of the toner in a bottle. It can be used for a week if refrigerated properly.
Egg White Moisturizer:
And in order to complete our oily skin care regime, we need the oh-so-essential moisturizer. Yes, even oily skin needs moisturizer for nourishment. Eggs are loaded with proteins that are great for skin. In addition, eggs are known to maintain the natural elasticity of skin. Therefore, what better way to pamper the skin than with egg white moisturizer?

Take an egg and separate the egg yolk from the egg white. Add 4 table spoons of almond oil and 1 table spoon of lemon juice to the egg white and mix thoroughly. Apply on face and let it dry completely. Clean face with warm water.
With most of the ingredients easily available in the kitchen or the freezer, there is no need to be worried about the problems of oily skin any more. Try out these wonderful natural face packs and masks and you may find yourself overjoyed with the results.
Credit:B Mukherjee
Monday, 22 June 2015
Fashion and Style Lookbook: Healthy Monday:What Do You Know About Breast Cance...
Fashion and Style Lookbook: Healthy Monday:What Do You Know About Breast Cance...: How do I check my breasts? There’s no right or wrong way to check your breasts for any changes. Try to get used to looking at and feelin...
Healthy Monday:What Do You Know About Breast Cancer
How do I check my breasts?
There’s no right or wrong way to check your breasts for any changes. Try to get used to looking at and feeling your breasts regularly. You can do this in the bath or shower, when you use body lotion, or when you get dressed. There’s really no need to change your everyday routine. Just decide what you are comfortable with and what suits you best.
Remember to check all parts of your breast, your armpits and up to your collarbone.
When you check your breasts, try to be aware of any changes that are different for you.

Listen to a discussion with one of our nurses about breast signs and symptoms and what happens at a breast clinic.
What should I do if I find a change?
Most breast changes are likely to be normal or due to a benign (not cancer) breast condition rather than being a sign of breast cancer. If you notice a change, go and see your GP (local doctor) as soon as you can.
If you don’t feel comfortable going to see a male GP you can ask if there is a female doctor available. When your GP examines your breasts they may feel that there is no need for further investigation, or they may refer you to a breast clinic.
For more information about what happens at a breast clinic and the tests you may have, see our relevant webpage or our Your breast clinic appointment booklet.
Some people think that if they have breast cancer they will have other symptoms alongside a breast change, such as feeling tired, having less energy or weight loss, but this is not the case. If you do notice a change it’s important to visit your GP.
Saturday, 20 June 2015
Fashion and Style Lookbook: DIY: How To Rip Your Jeans
Fashion and Style Lookbook: DIY: How To Rip Your Jeans: The ripped denim has been in existence since the 80s but has become more popular than ever as everybody including celebrities like Ki...
DIY: How To Rip Your Jeans

The ripped denim has been in existence since the 80s but has become more popular than ever as everybody including celebrities like Kim Kardashian, Beyonce and Rihanna, is rocking it. It is a super fun way to step out looking classy and chic. It is versatile as you can wear it with almost everything (as long as you know how to balance it with your outfits so you don’t come off looking trashy or unkempt) and you can wear them almost everywhere too.
However, it can be really tough bringing out cash to buy something that looks like it was picked from a mad person’s cloth pile; even if it was cheap, it would still be somehow hard to use your hard earned cash to purchase something so edgy. Besides, we all have different tastes and so getting the right jeans ripped in the right places, in the right proportions may also be a tough one. Instead of being bothered about all those things mentioned above, you could just make them yourself. That way you can rip your jeans just how you like it and where you like it. Highlighted below are five steps to make ripped denim by yourself, in the comfort of your home:
1. Choose Your Jeans: the first step is to obviously pick out the jeans you want to rip. However, it is advisable to try it out first on a pair of old jeans or really cheap ones, so you don’t end up wasting a good pair of expensive jeans. You should also put in mind the style you want for your ripped jeans; maybe high waisted, mid-rise, tight, skinny, boyfriend style, and the color too, whether you want black, blue or white. Note that if you want your ripped jeans to look really worn and you don’t have a pair of old worn out jeans, you can wash it couple of times with water and add bleach to it before you rip it.
2. Gather The Materials To Distress And Rip Your Jeans: in order for your jeans to come off looking really neat, it pays to distress your jeans first. To do this, you need sandpaper or a paint removing block, steel wool and a pumice stone. To rip the jeans, you need a super sharp small scissors, an x-acto knife or a box cutter. You should also get a small wooden block or a thick cardboard which will be placed inside the jeans so you don’t affect the back of the jeans except if you want it to be a double sided ripped/distressed jeans.
3. Put On Your Jeans To Mark Where You Want It Ripped: the next step is to put on your jeans to mark where you want your tears to be. It is best to wear your jeans so you can get the perfect places you want ripped. Get a chalk or a bright pen or a permanent or safety pins to mark where you want to rip. Make sure you do this while standing in order to get your jeans perfectly marked
4. Distress Your Jeans: Lay the jeans on a flat surface and start rubbing the jeans with your pumice stone, sandpaper or steel wool till it starts to thin out or till it starts to worn out. The time for it to thin out depends on the thickness of your jeans. If you want it in the knee area, it will be easier for you to tape the sandpaper to the floor and just slide around on the paper (your knees may hurt badly afterwards though especially if you have really tender skin).
5. Start Making Holes In Your Denim: once you’re done distressing, take you scissors, use the edge and not the tip and start scraping the areas you want your rips to be. Do this horizontally. If you just want distressed jeans, just scrape till you can see the white horizontal threads beneath denim surface. Then you can use tweezers to fray the threads. If you want really big holes, start cutting the distressed areas with you x-actor knife or scissors.
Your distressed jean is ready to be rocked. Note that this may take a really long time to do especially getting the jeans distressed but it is fun and a cheaper way to get your ripped jeans without worrying so much about cash.
Thursday, 18 June 2015
Fashion and Style Lookbook: Fashion Experts Reveal How To Walk In High Heels -...
Fashion and Style Lookbook: Fashion Experts Reveal How To Walk In High Heels -...: This quick (and free!) fashion hack vows to help you walk in even your highest pair of heels without pain… Ah, high heels - they’re beautifu...
Fashion Experts Reveal How To Walk In High Heels - WITHOUT PAIN

This quick (and free!) fashion hack vows to help you walk in even your highest pair of heels without pain…
Ah, high heels - they’re beautiful, but so very, very painful.
It’s a shame, because all of those blisters and achey bits means that we go from walking like this:

To walking like THIS:

Which, you know, kind of ruins the look a bit.
Thankfully, there’s a solution - and it’s super-easy AND cost-free!
Author of Shoe Are You? Meghan Cleary is a veritable shoe expert - and she shared her top tip for combatting high heel fatigue with fashion blogWho What Wear.
The shoe guru (shoeru?) explained that women should run their feet under cold water (even if it’s a sink in the bathroom), put a little hand lotion on their still-damp feet, and then pop their heels back on.
"I personally have gotten another four hours out of a pair doing this mid-event," she said.

The trick, which is actually pretty scientific, works because the lotion seals in the moisture of the cold water and helps to lubricate any sore spots.
So, because of this, you need to make sure you put your feet back in your shoes damp, not completely wet.
Tuesday, 16 June 2015
Fashion and Style Lookbook: The Trick to Using Blush and Bronzer So It Looks N...
Fashion and Style Lookbook: The Trick to Using Blush and Bronzer So It Looks N...: Pulling off blush is not easy,if you are heavy handed you could end up looking clownish. Enjoy this beautiful tutorial.
The Trick to Using Blush and Bronzer So It Looks Natural

Pulling off blush is not easy,if you are heavy handed you could end up looking clownish.
Enjoy this beautiful tutorial.
Monday, 15 June 2015
Fashion and Style Lookbook: A Lazy Girl's Guide to Morning Makeup
Fashion and Style Lookbook: A Lazy Girl's Guide to Morning Makeup: Why make waking up any harder than it needs to be? We all have those mornings where we just don't feel like getting up and starting the ...
A Lazy Girl's Guide to Morning Makeup
Why make waking up any harder than it needs to be?

We all have those mornings where we just don't feel like getting up and starting the day—let alone putting on makeup. Because really, how can you be expected to put on eyeliner when your eyes are only half awake? If that sounds way too familiar, here are some minimalistic makeup tips that will help you maintain a gorgeous look without any extra hassle.
Cover Up with BB/CC Cream
The overall application of coverup can be the longest part of the makeup routine. From moisturizer to concealer to powder foundation, it's no wonder we want to ditch our routine. To speed up this part of process, use a BB or CC cream. It'll work as a moisturizer while applying a light layer of coverage. It also adds a healthy glow to give you a nice fresh-faced look.
Strategically Apply Bronzer
Putting bronzer in key areas can make all the difference. Just a swift sweep of the bronzer brush over your temples, along the sides of your face, and right under the cheekbones is all it takes. This will immediately strengthen your bone structure without the need to completely contour anything.
Create an Easy Smoky Eye
On a lazy morning, a smoky eye sounds like the last trick you want to try. And with all the different eye shadow shades and eyeliner tricks around, creating this look can be too excessive. However, it doesn't have to be! You can create a simple daytime smoky eye by applying a eyeliner pencil on the top and bottom lash lines. Then just use a smudging brush to create the hazy, blended effect.
Focus on Your Bottom Lash Mascara
We love how eyeliner outlines and shapes our eyes. However, it does take a certain technique that we aren't always up for first thing in the morning. To get the same eye-shaping effect, apply a quick layer of mascara on the bottom lashes. You already have the mascara brush out for your top lashes, so what's a quick swipe of the bottom ones?
Go with a Bold Lip
If you decide to go bare everywhere else on your face, at least commit to a bold lip. It'll act almost as a distraction for the lack of other makeup. A girl with a bright-colored lip immediately looks put-together and ready to rock her day.
Credit:Emily Rekstis
Thursday, 11 June 2015
Fashion and Style Lookbook: Relaxers & How to minimise hair loss when retouchi...
Fashion and Style Lookbook: Relaxers & How to minimise hair loss when retouchi...: I used to be the girl that would remove her weave and get her hair relaxed on the same day.I often left the salon disappointed because ...
Relaxers & How to minimise hair loss when retouching

I used to be the girl that would remove her weave and get her hair relaxed on the same day.I often left the salon disappointed because my hair would be the same length or in some cases shorter and thinner than when I installed the weave. I did not know what I was doing wrong.
A lot of us relax our hair but unfortunately a large percentage of us suffer hair loss as a result of it. This blog post will be the first of a two part series about relaxers and how to prevent hair loss as a result of relaxing.
In this post I will address the following
1) How do relaxers work (to give readers a better understanding of the risks involved)
2) Types of relaxers (to help readers decide which is best for their hair and scalp)
3) How often should hair be relaxed
4) Preparing hair for retouching and why this is an ESSENTIAL step for preventing breakage
HOW DO RELAXERS WORK

Our hair has several types of protein links/bonds in its structure. Relaxers work by opening the cuticle layer and penetrating the cortex of our hair.
The relaxer breaks some of the protein links in the cortex our hair. The hair is then smoothed/pulled into its new straightened shape.
The unfortunate truth is that relaxers work by weakening the structure of black hair. Please note however that relaxed hair can still look healthy and be strong if correct steps are taken before, during and after relaxing.If relaxers are abused or used too often it can result in damage to the scalp and cause major hair loss. This risk is well publicised but unfortunately several of us ignore this advice because the hair loss that occurs may not be immediate. Relaxer abuse will result in weakened hair that breaks gradually over weeks and months.
LYE RELAXERS

These are usually packaged in a jar or tub and are ready for use, i.e. there is no need to mix them with activators. They are sometimes called No-Base Relaxers.
PROS
Lye relaxers are said to be better for hair fibres because the formula does not leave mineral deposits on the hair. Mineral deposits left on hair fibres can hinder its ability to absorb moisture.
Also the levels of protein breakage that occurs with lye relaxers will allow the hair to retain more of its natural strength and elasticity than no-lye formulas.
CONS
Lye relaxers can be quite harsh on our scalp in comparison to no-lye relaxers. For this reason, lye relaxers may not be suitable for ladies with very sensitive scalps or ladies that burn easily.
NO-LYE RELAXERS
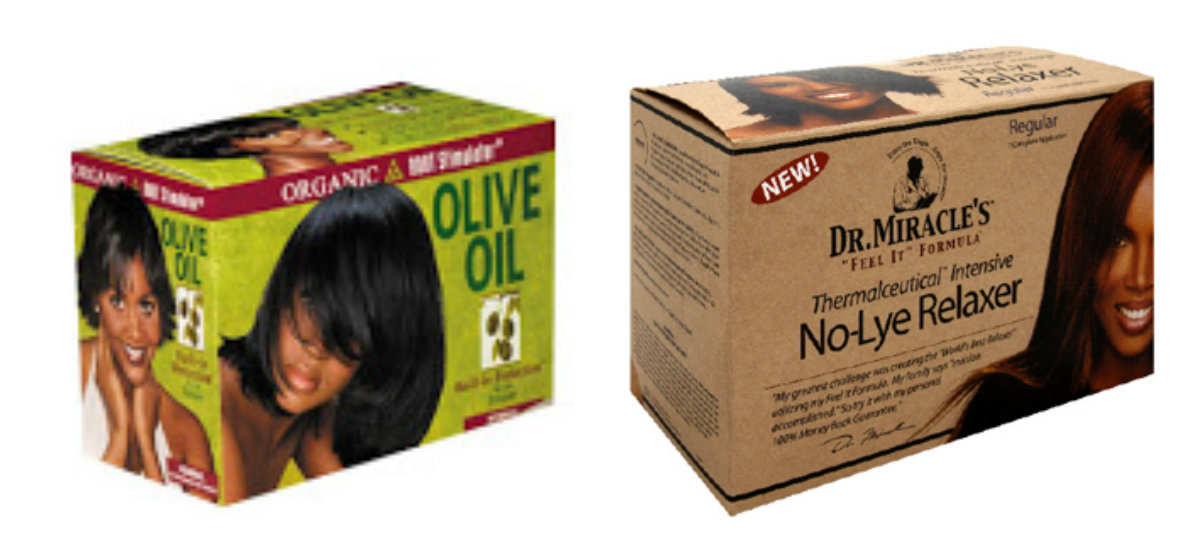
These usually come in a box kit that contains activators to be mixed in to activate the formula.
PRO
No-lye relaxers are said to be “easier” on the scalpthan lye relaxers. This means that it is not as harsh on the scalp as lye formulas. So if you have very sensitive scalp which burns easily you may want to consider using a no-lye relaxer. Please note that all chemical relaxers (lye or no-lye formula) can cause severe scalp burns and hair loss if it is used incorrectly
CONS
No-lye relaxers can leave our hair quite dry. This is because no-lye formulas leave some mineral residues on our hair fibre which decreases its ability to absorb moisture. Remember dry hair has a higher risk of breaking. To overcome this problem a chelating shampoo should be used once a month if you use a No-lye relaxer formula. Chelating shampoos work beneath the surface of the hair fibres to remove stubborn minerals from no-lye relaxers, chlorine in swimming pools and hard water residue
When your hair has been relaxed, you should wait at least 8 weeks before your next relaxer. Relaxers are meant to be applied to new growth and not on hair that is already relaxed.
The amount of new growth we have before 8 weeks is usually less than 1 inch long. If relaxer is applied to hair that has very little new growth, it will come in contact with previously relaxed hair thereby relaxing it twice and over processing it.
Over processed hair is very damaged and it will break easily over the following weeks and months.
Stretching Beyond 8 Weeks
The directions on most chemical relaxers suggest that hair should be retouched every 8 weeks. Please note however that you can extend the amount of time between your relaxer touch ups for longer than 8 weeks.
Extending the amount of time between your relaxers for more than 8 weeks is known as stretching. For example several ladies on healthy hair journeys stretch their relaxer touch ups to every 10 to 12 weeks,
PREPARING HAIR FOR RELAXING
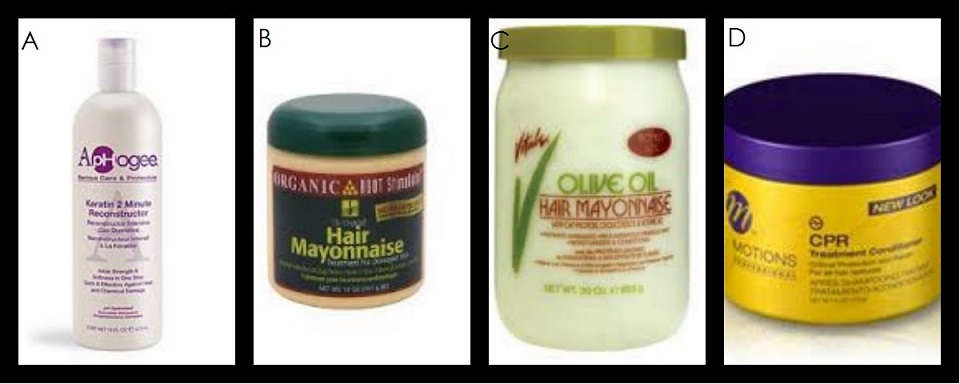
Protein Conditioners
As noted above relaxers work by breaking down some of the protein bonds in our hair. If hair that is lacking in protein is relaxed, you can begin to imagine how fragile it will be after the relaxer process. Hair this fragile and damaged will not be able to withstand daily wear and tear and although breakage may not be immediate, it is almost inevitable. It is therefore essential to prepare for relaxing by ensuring that your hair is not lacking in protein. Hair should be washed and deep conditioned with a protein conditioner a week before it is relaxed.
Hair that has just been removed from extensions is usually weak and in need of protein so to proceed to relaxing it the same day is a recipe for disaster: sooner or later the breakage will occur.
Hair that has been removed from extensions should be thoroughly detangled, washed and conditioned with a protein deep conditioner the week before relaxing. The hair should be washed in sections or in single braids to prevent matting and tangles.
Allowing a week between removal of extensions and relaxing will also give your scalp a chance to recuperate.
Credit:Hairducation


Subscribe to:
Comments (Atom)